TL;DR – Uninitialized/non-UTF-8 data in motherboard DMI fields causes the Proxmox bare metal installer to stop when fetching answers.toml over the network. I don’t have a good fix, I opened a bug report.
Update 9/10: a patch has been introduced upstream!
I finally got around to trying an unattended PXE installation of Proxmox onto an Intel NUC and immediately hit a bug that halted the install. Apparently when configured to fetch the customizations answers file over HTTP it does some DMI introspection of the system to send along in the HTTP POST request for the answer.toml file (which is kinda neat). My NUC was causing the installer to error with:
root@proxmox:/# cat /tmp/fetch_answer.log
INFO: Fetching answer file in mode Http:
INFO: Gathering system information.
INFO: Fetching answer file via HTTP failed: Error: 'stream did not contain valid UTF-8' on /sys/devices/virtual/dmi/id/board_asset_tag'
ERROR: Aborting: Could not find any answer file!
Nothing showed up on the build HTTP server yet because it aborted before even attempting anything.
The key here was path in the error message, which told me it was trying to look up the system’s asset tag in DMI fields. When I looked at what’s in that file, it was garbage:

DMI Type 2 board asset tag data
and because of that it was failing to be decoded as UTF-8, and causing the installer to bail.
(TIL the DMI information is available from the kernel /sys/ filesystem without dmidecode installed.)
Root cause
The installer is kicked off by a call to unconfigured.sh. This runs /usr/bin/proxmox-fetch-answer, which is what actually tries to fetch the answers file built in to the ISO image, HTTP, or a partition, and redirects the output to a file in /run/. This is then fed to the actual installer at the next step.
After digging through the pve-installer code, the problem lies in https://github.com/proxmox/pve-installer/blob/master/proxmox-installer-common/src/dmi.rs. The bare metal installer plugin proxmox-fetch-answer/fetch_plugins/http.rb calls out to sysinfo::get (proxmox-auto-installer/src/sysinfo.rs), to proxmox_installer_common::dmi::get()?, then let content = match fs::read_to_string(&path) tries to coerce each of those results into string. However if the data from DMI is not UTF-8, it returns an error, when it should probably skip over it. Apparently it’s a coincidence this module is named “sysinfo” and is not related to the Rust sysinfo crate, which initially confused me.
There’s no way to skip over or avoid this error with a flag or option.
Other Intel NUCs I have have similar randomness in their DMI asset tags, so it would likely fail on them too.
$ cat /sys/devices/virtual/dmi/id/board_asset_tag | xxd
00000000: ffff ffff ffff ffff ffff ffff ffff ffff  ................
00000010: ffff ffff ffff ffff ffff ffff ffff ffff  ................
00000020: ff0a                                     ..

$ cat /sys/devices/virtual/dmi/id/board_asset_tag | xxd
00000000: c01c 5b87 0a                             ..[..

$ cat /sys/devices/virtual/dmi/id/board_asset_tag | xxd
00000000: 0a                                       .

$ cat /sys/devices/virtual/dmi/id/board_asset_tag | xxd
00000000: 0a
Workarounds?
Booting with modprobe.blacklist=dmi_sysfs to completely skip exposing DMI data in the sysfs didn’t work, as it was already compiled into the kernel and not as a module. This may or may not be a good idea to skip anyways as DMI data would be handy identifying the system, else you’re just left with the ethernet MAC address to identify the target system.
Fetching a host-specific answers file baked into the initrd/ISO file doesn’t help me, as I want to fetch from the build server to customize the data being sent back, and I sure don’t want to be in the business of per-host images. However this does indeed skip the DMI lookup.
Fetching the answers URL through a DHCP option doesn’t matter, because it’s still going to take the URL provided and perform the exact same DMI and HTTP request.
I looked into trying to patch the initrd, but it’s not simple. It has BusyBox and a wget alias, so in theory you could wget the answer file directly and drop it off on the system somewhere. The problem is there’s not a good place to bolt this onto unconfigured.sh, you’d either need to overlay/bind mount a new patched copy of unconfigured.sh or a wrapper pretending to be /usr/bin/proxmox-auto-installer. It’s certainly doable but now you’re carrying around a bunch of one-offs you need to script for the inevitable next version.
The other option is to fix the data in the DMI fields. I got lucky and found a copy of the Intel Integrator Toolkit v6.1.10 on Internet Archive that works on these NUCs. Unfortunately this only modifies DMI type 3 fields (“chassis”) and does not change the DMI type 2 fields (“base board”) that we need:
# dmidecode -t 2
# dmidecode 3.6
Getting SMBIOS data from sysfs.
SMBIOS 3.0.0 present.

Handle 0x0002, DMI type 2, 15 bytes
Base Board Information
	Manufacturer: Intel corporation
	Product Name: NUC6i3SYB
	Version: H81132-503
	Serial Number: GESY61500EPR
	Asset Tag: .=\.                 <<<<<<<< !@#!@$!#!!
	Features:
		Board is a hosting board
		Board is replaceable
	Location In Chassis: Default string
	Chassis Handle: 0x0003
	Type: Motherboard
	Contained Object Handles: 0
Here’s where I turned my attention to EFI NVRAM variables. I discovered there’s a variable that contains all of the DMI type 2 data, the Intel board model, serial number, and our weird asset tag:
root@prox01:~# efivar -l | grep -i dmi
70e56c5e-280c-44b0-a497-09681abc375e-DmiData
I turned Claude loose on that variable to make sense of it. It tried several different ways find the data format and to try to write new data to the variable in hopes this would change the motherboard data, but in the end finally gave up and decided the system firmware itself must be preventing any writes to it. No luck there.
In the meantime I got this system installed by hand but now I got nerd sniped I’m invested enough in this problem I need to open a bug report with Proxmox.
9/8: opened bug id #8020
9/8: I didn’t think about the BIOS version last night, but no, upgrading to the latest version (0051 -> 0073) didn’t help either:
root@prox01:~# cat /sys/devices/virtual/dmi/id/bios_version
SYSKLi35.86A.0073.2020.0909.1625
root@prox01:~# cat /sys/devices/virtual/dmi/id/board_asset_tag
�=\�
root@prox01:~# cat /sys/devices/virtual/dmi/id/board_asset_tag | xxd
00000000: 883d 5c87 0a                             .=\..
9/10: It turns out the old SMBIOS specifications didn’t have a UTF-8 requirement on text strings, these NUCs are based on 2.8 from 2013. The UTF-8 requirement appears to be added around spec version 3.4 in 2020. TIL.
Hand wavy installer overview
As a bonus, here’s my overview of how the whole unattended PXE install process works. Compared to how CentOS kickstart and Ubuntu autoinstall works, it’s kind of janky. After going through the process I kind of get why it is the way it is, it’s just work. The big part is you have to piece together a custom initrd by gluing some files together, then serve that to your target system. There’s just not a “net-installer” image you download.
First, you need to take a Proxmox VE .ISO file, mount it locally, then copy the linux26 kernel and initrd.img files out of the image onto your build tftp/http server. Then you have to run proxmox-auto-install-assistant (which is only packaged for Debian/Ubuntu, I used a container on CentOS) which writes all of four lines to one copy of an answer.toml file you’ll bundle into the installer:
mode = "http"
partition_label = "proxmox-ais"

[http]
url = "http://build.wann.net/ks/proxmox/answer.toml"
it also spits out a prepared.iso file. This is almost exactly the same .ISO you downloaded originally with the first version of answer.toml tossed in but not quite. You take the prepared.iso file, turn it into a gzip’d cpio file, then straight up append this to the original initrd.img you extracted from the ISO image (i.e. cat boot/initrd.img proxmox-iso.cpio.gz >> initrd.img) whew. You now wind up with a 1.7 GB initrd.img file that’s pretty much self contained. There’s ample warning you’ll want to serve this over HTTP and not over TFTP.
Now, when the target system PXE boots, downloads from your PXE/build server the linux26 and the generated initrd.img which contains the ISO image. Instead of fetching packages from a repo server, the ISO image /proxmox.iso is locally mounted at /cdrom. Here’s where the installer goes to fetch the real answers.toml file from your build server over the network with HTTP. How you serve that file is up to you, a static file, or some sort of dynamic script pretending to be that URI. The answers file is fed to the actual installer program and off it goes, installing packages to disk from the /cdrom partition in RAM.
[someday insert sequence diagram here]
Now I need to come up with a post-script to tweak my installs.
Intel Integrator Toolkit
The ITK isn’t completely useless. In the process of trying it it out on the NUC I was able to modify the Type 3 Chassis data and here set the asset id to TUX-1234:
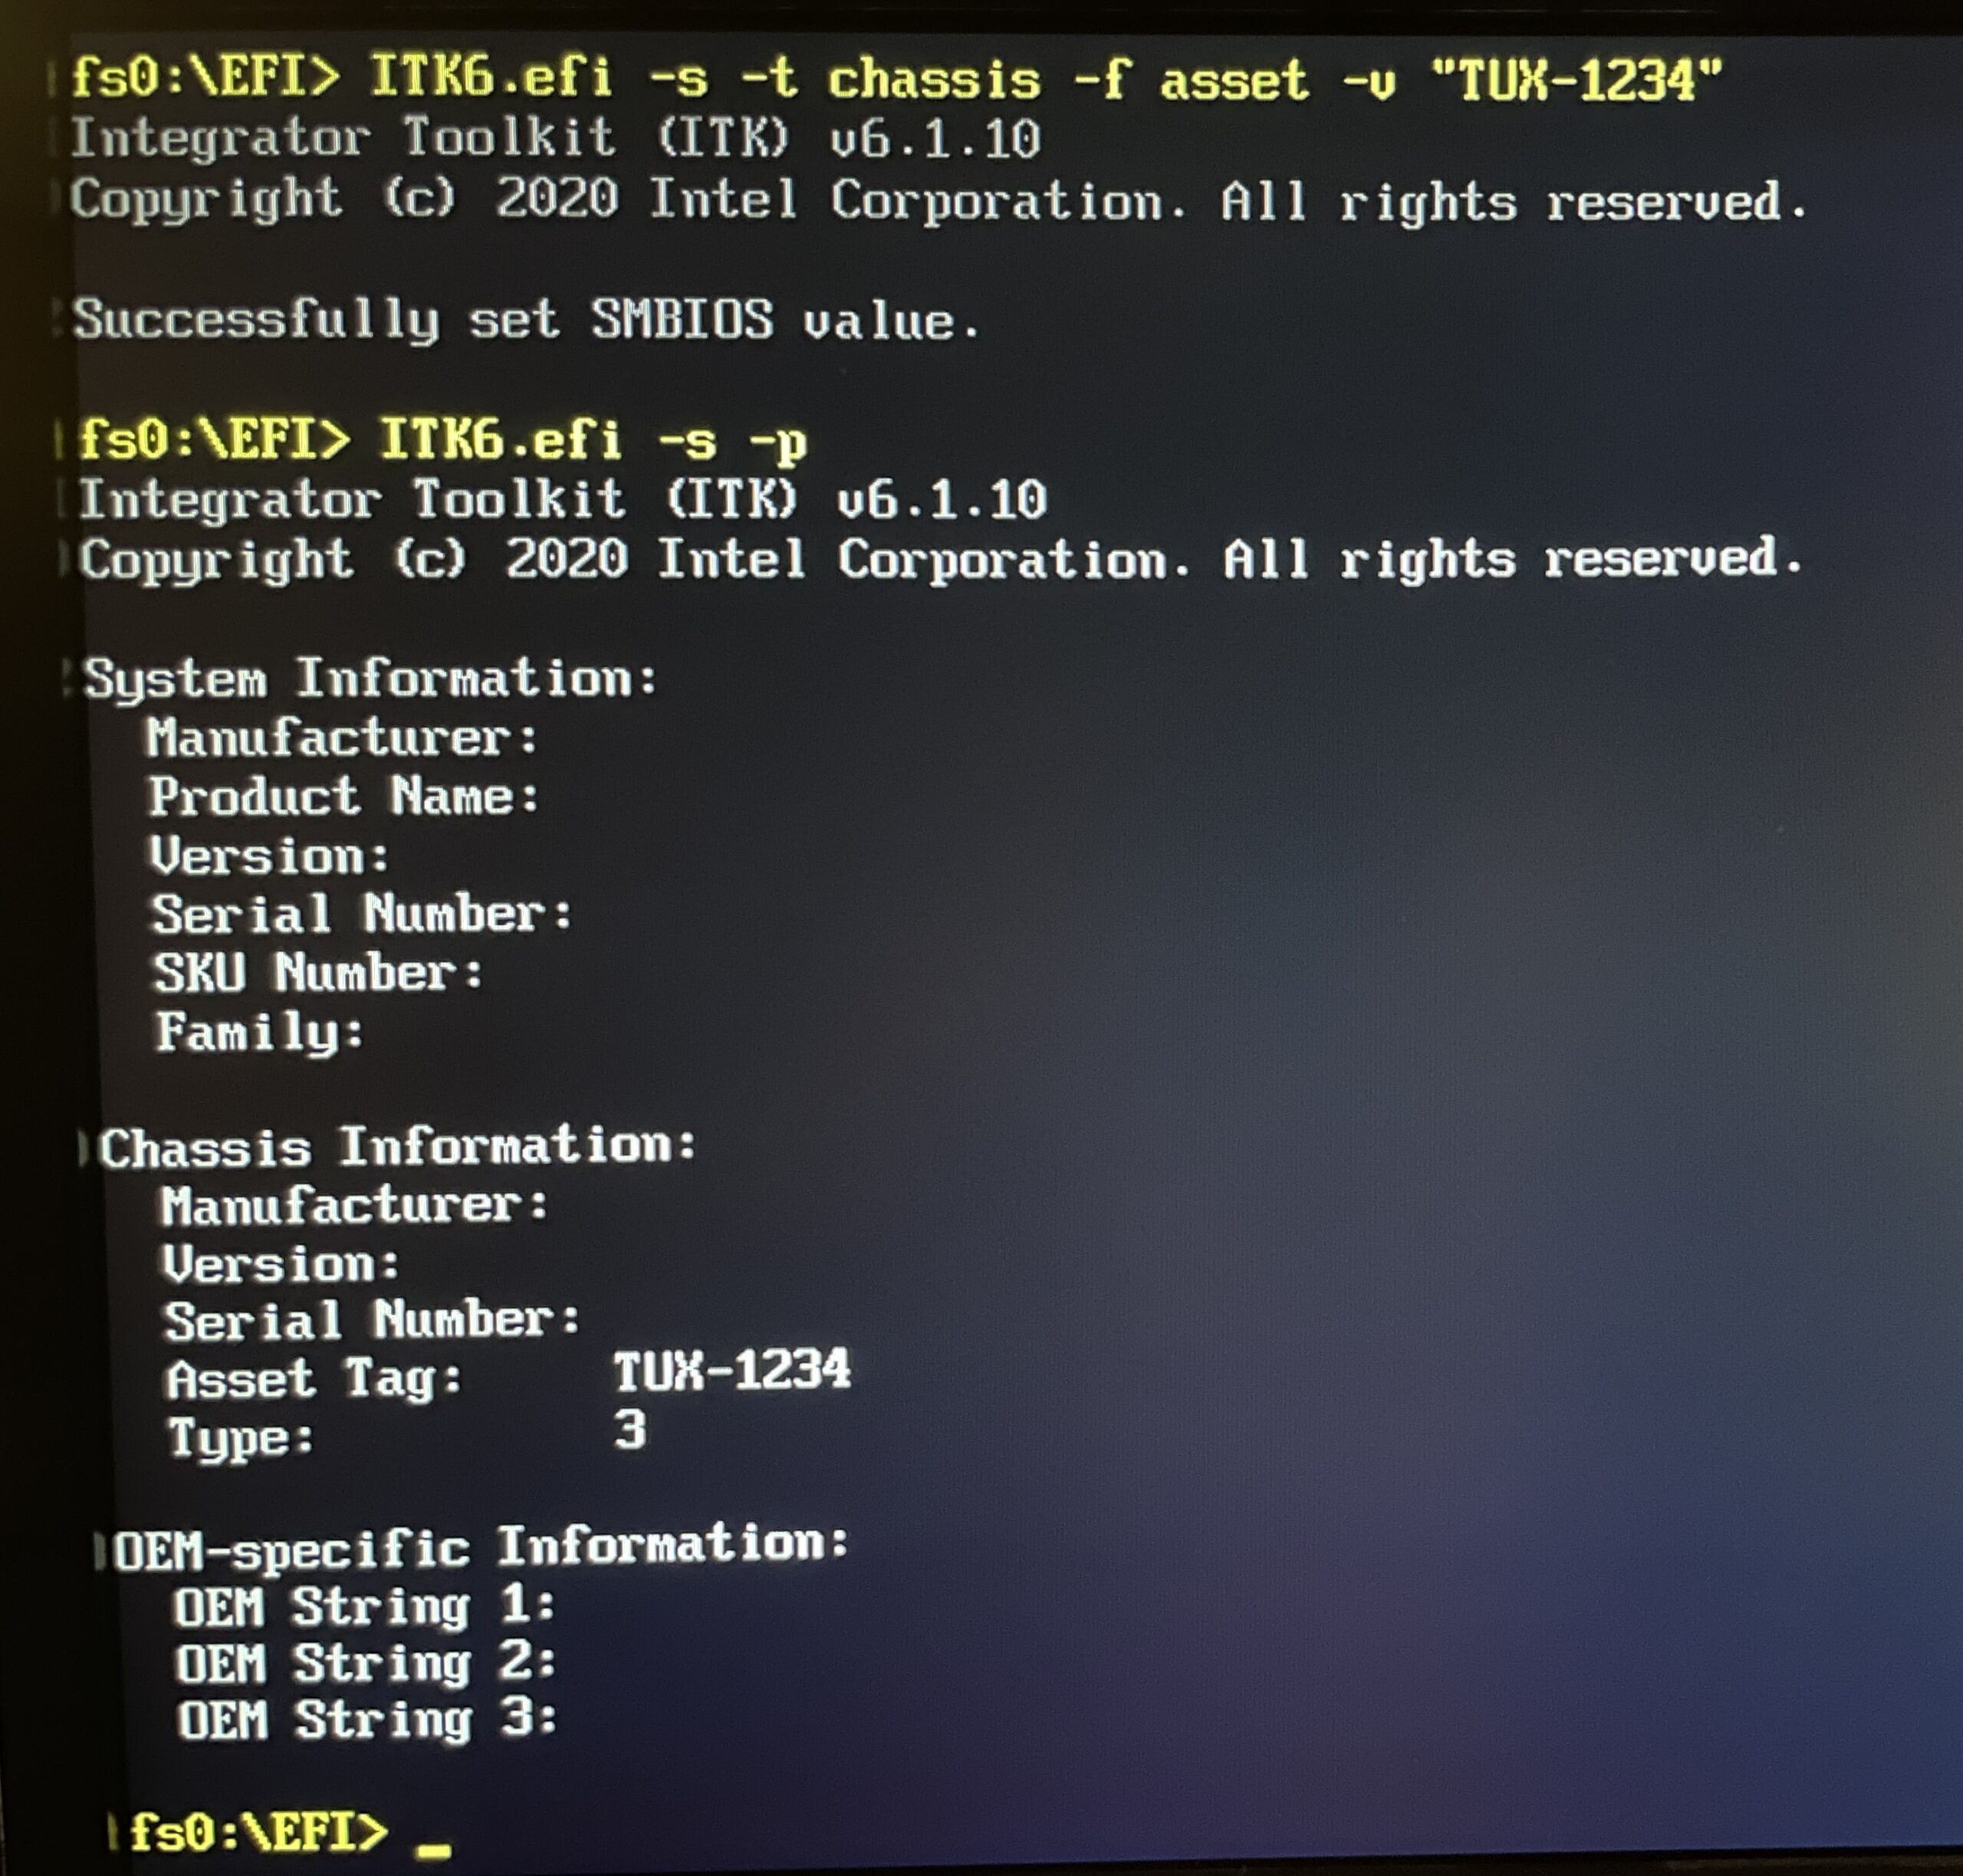
Using the ITK to change the Type 3 chassis asset tag
The toolkit is just a EFI PE binary that you run from the UEFI shell from the motherboard. You can either extract and copy ITK6.efi to your system’s EFI system partition (e.g. /boot/efi/EFI) like I did, reboot, and go into the UEFI shell to run it, or burn it onto a USB thumb drive and boot off of it to run it. Either way it’s going to involve rebooting. Copying it to the ESP was easiest for me, I didn’t have to go fetch a USB drive. I don’t think there’s a Linux or Windows userspace version of this tool so I don’t know how you’d do this at any sort of scale.