ikeacluster
Oct 24th, 2013 by bwann
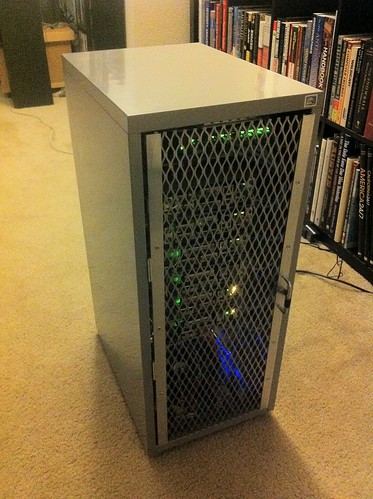
ikeacluster in 2016, under my desk
Compact, quiet, power efficient homelab that actually gets used for mockups and lab purposes.
At my day job I get to work on lots of clusters of servers so naturally I wanted my own lab cluster at home to play with. The problem is I’m over that phase of life when I’m wiling to deal with a stack of noisy computers with a rat’s nest of cabling in the corner consuming who knows how many hundreds of kilowatts of electricity. I also did not want to go the VM route, I wanted lots of small real systems, neatly and quietly.
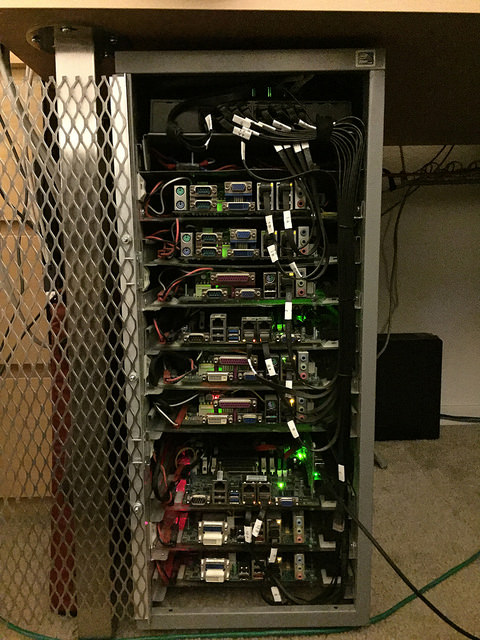
I came up with the IKEA cluster, a completely self contained x86_64 home server lab, inspired by several other IKEA hacks. It’s based on the IKEA HELMER cabinet with some custom metalwork I did in my apartment by hand on a Sunday afternoon. It’s 29″ tall and is designed to roll under a desk, with only three cables coming out.
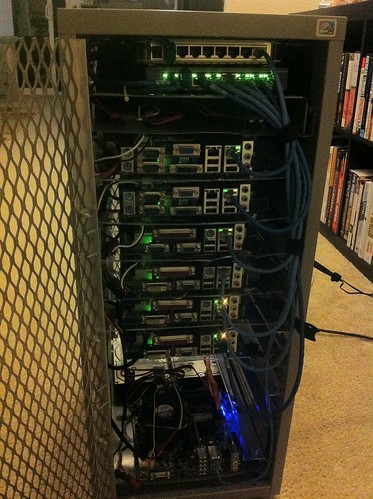
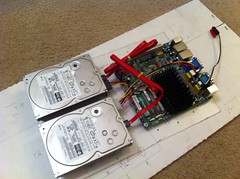
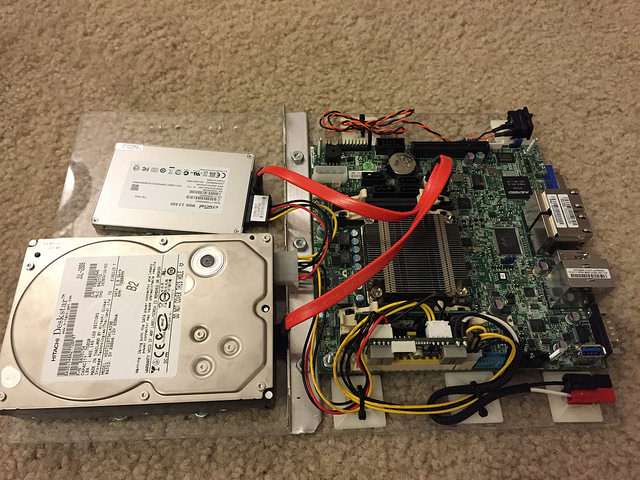
The cabinet was $40, the metal and hardware for the doors and Lexan sheets were on the order of $50-75 (I think!). It holds up to 10 mini-ITX motherboards, up to 20 3.5″ hard drives, all powered by a single ATX power supply with room for a 16-port ethernet switch.
Second important factor from noise was energy consumption. With 8 nodes, 10 hard drives, ethernet switch all on, it draws only 230 watts. Each system blade is about 30 watts.
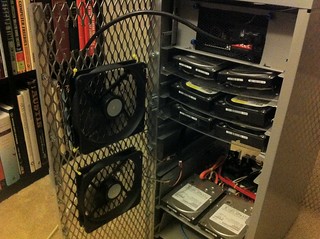
Not only motherboards, there are hard drives too! I was hesitant to add fans because I did not want noise *at all*, but I compromised and added three 120mm low-RPM fans in the rear door to keep them all cool. The airflow noise is noticeable but completely acceptable; the hard drive seeks make more noise.
I run Chef to manage the OS and configuration on all the nodes. This way I can change their roles easily, fiddle and hack around all I want and blow it all away and re-setup to a good working state in minutes. Chef, by the way, is really awesome and you should use it (or Puppet) if you are in any way in charge of managing >0 servers. Don’t be in denial like I was all those years and willing to mindlessly type out commands and follow the same wiki setup page over and over when setting up new systems.

One could probably argue that I was ripping off the basic server sled designs from the OpenCompute Project, but I did this on my own. I wanted really stripped down systems and it was a happy coincidence the same sort of principals for vanity-servers still comes into play on such a small scale!
Best of all it was just a ton of fun to build!
Right now (2013) it consists of 8 systems:
- (2) Intel D2500CCE Atom 2x.186 GHz, 2 GB RAM
- (1) Intel D2500HN Atom 2×1.86 GHz, 2 GB RAM
- (3) Intel D2700MUD Atom 2×2.13 GHz, 2 GB RAM
- (2) Intel PDC LGA775 2.93 GHz, 4 GB RAM
Construction photos:
The previous play by play commentary:
- https://binaryfury.wann.net/2012/05/ikea-hacking-helmer-mini-server-cabinet/
- https://binaryfury.wann.net/2012/08/ikea-cluster-power-retrofit/
- Full build instructions, photos, laser cutter files: https://github.com/bwann/homelab, posted to reddit for sheer karma whoring
Various things I use for it:
- Chef server
- Kubernetes and containerization
- IPv6-only testing
- Anycast services announced via BGP
- ProxySQL, Haproxy
- OpenTSDB, frequent metrics collection
- Hbase and Zookeeper for OpenTSDB
- Provisioning+PXE installation testing
- OpenNMS, monitoring
- Hashicorp Vault
- Hadoop (mainly for HDFS)
- Apache, nginx
- Varnish front-end cache for CentOS package repos
Updates:
- New router: ikeacluster has its own top-of-rack router and speaks BGP to my home network router. This is the sort of setup we run in production. Replaced the three-port Ubiquiti EdgeRouter-Lite with a five-port Ubiquiti EdgeRouter-X. This gives me two gigabit uplinks to my other router and two links to the cluster switch. I wanted this to mainly play with BGP ECMP. Unfortunately the ER-X doesn’t have enough RAM or storage to run Chef, so I lose that. The Ubnt five-port POE switch should fit, but it’s considerably more expensive.
- New switch: I also replaced the two eight-port Netgear switches with a single 16-port D-Link DGS-1016A switch. This was the densest switch I could find that would fit within the limited 9.5″ width. It lets me do basic transmit (i.e. bonding mode 5) link aggregation/bonding to a few of the motherboards that have dual Ethernet.
- Flat cabling: I opted for pre-made 1, 2, and 3-foot flat cat5e cables to go between the switch and the motherboards. They pack down much nicer than a bundle of round cables and make it easier to keep the door closed.
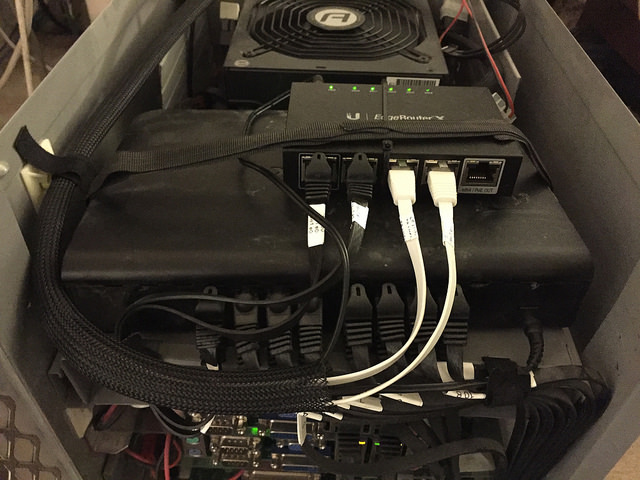
Ubiquiti EdgeRouter-X
- Reinforcements: Reinforced sleds with an aluminum cross bar. Over time the acrylic sleds would droop due to the heat and weight of hard drives. I bolted a 1/2″ x 1/4″ L-shaped bar across each sled to reinforce them. I also used sticky cable tie pads to anchor the power pole connectors, power switch into place, and to keep the cabling snugged down so it was less likely to snag on things.
- Solid state drives: I also started using small SSDs when I ran out of spare hard drives. The benefit is that they run cooler, quieter, with a little less power usage. Plus SSDs are just awesome and are really falling in cost.
- New Avoton-based motherboards: The latest Intel Atom-based SoC now comes with 4 or 8 cores. I now have a couple of SuperMicro A1SAi-2550F boards when I needed something with a bit more power, RAM, and needed the IPMI for testing, but not without consuming a lot of power. They also have quad-gigabit interfaces on board. They’re pricey, but pretty nice boards. The PCIe x8 slot will also take a 10-gigabit NIC at the expensive of vertical height.
Reinforced system sled, tidyed up cabling
- Jan 2019: I got access to a laser cutter and made brand new system sleds that actually look nice, and posted all of the cabinet build and design files on github: https://github.com/bwann/homelab

- April 2022: ikeacluster turns 10!