
I finally gave in, adding fans and a 620 W ATX PSU to the IKEA cluster. Fortunately it remains fairly silent and draws little power.
If I was going to power 8-10 servers in the cabinet, multiple 192 W 12VDC power supplies got clunky and the hard drives generated a ton of heat that couldn’t be passively cooled well. Not only that, I needed to maintain a ~40W buffer for hard drive spinup on each PSU so it was inefficient to go this way. Going the PSU route also simplified a lot of wiring.
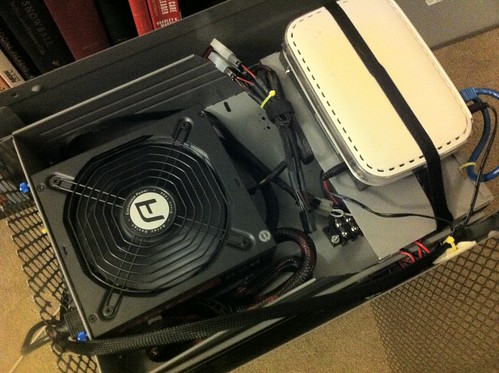
I have a single Antec 620 W ATX PSU mounted at the top of the cabinet, using one of the HELMER drawers as a mount. I don’t actually use the ATX power cabling here, I have it shunted with a terminator so it’s always on. I take the two 4-pin 12V feeds and tie these to a pair of little 8-screw terminals. From there each motherboard has a picoPSU (really a DC-DC converter) ranging anywhere from 80W-150W.
The PSU route works really well for a several reasons. The particular one I has detachable connectors, so I can get rid of crap I don’t need in here. It has a big fan, virtually silent. Mounted in the top of the cabinet in a drawer it not only gets rid of wiring clutter on the floor, but the fan helps pull the heat off the switches. Plus, tons of headroom. Napkin math says 10 systems at 50 W peak still gives me about 10% headroom at max so I’m reasonably secure I won’t burn my apartment down. As it stands right now, seven motherboards running a CPU stress test + eight hard drives draws around ~220 W. The entire cabinet has a footprint of 4 cables: ethernet, PSU power and power for two switches.
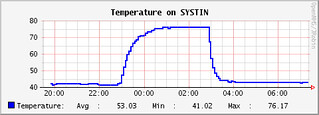 As far as fans go, I mounted two 120mm fans on the rear door and connected them to systems #1 and #4. I bought the slowest, biggest fans I could get at 1000 RPM. With the motherboards running the fans, they keep it around 870 RPM. The result was obviously huge, components dropped 30-40 C! Hard drives are now no longer just beyond the threshold of painful to hold onto.
With the PSU in the rear of the top drawer and wiring terminals in the front, there was a lot of empty space that was perfect for a pair of 8-port Ethernet switches. At first I thought I was going to have to build some little shelf railing contraption to hold it, then I realized I could take a 5″ deep section of drawer, turn it upside down, cut notches for the power cabling underneath and I had a tidy little shelf for the switches.
In the process I cut the power tray in half, thinking it would be handy to make the PSU totally separable from the wiring terminals. In practice this wasn’t a good idea because sliding the first motherboard underneath makes it super easy to snag SATA cables. Oh well.
I also trimmed a half inch off the end of each system tray to make room for the ethernet cables to flex. Sawing through eight sheets of acrylic with a hand saw for such a small amount was a giant pain in the ass, but the result is worth it. The door can shut flush without bunching up the cabling.
Now I’m considering how I can make some sort of drive tray…
Just how many 2.5″ hard drives can you cram into a 3″ x 9.5″ x 15″ space!