I’m fresh off of two medical classes in August, first the NOLS Wilderness First Responder course, then a two day “Direct Action Response Training” by Dark Angel Medical. The DART course went over how to use a personal trauma kit (a/k/a individual first aid kit, or IFAK) and responding to immediate life-threatening events, such as a gunshot wound, stabbing, blast, or some other serious accident. I’m a believer in the saying “if you learn how to put holes in people, then you should learn how to patch holes.”
DART was hosted by the San Mateo County Sheriff’s Office, so about 3/4 of the class of 26-something people was either personnel from various sheriffs agencies, SWAT, police, or correctional officers, which was sort of intimidating. The rest were civilians, concealed carry holders, and/or private security. The instructor was named Ross, a former Navy corpsman, now a paramedic in San Bernardino.
There was a lot of overlap between the WFR and DART courses, such as patient assessment, wound treatment, splinting, and environmental issues, but it was far more compressed than the 10 days of WFR training. There were also a lot of differences, namely in treating life threatening hemorrhages and getting an open airway over everything else in an urban, tactical environment. This followed the military’s tactical combat casualty care (TCCC) guidelines, e.g. stop the threat to you and your patient, get them to cover, stop the bleeding, maintain an airway.
The assumption was that you would be in an urban environment and higher level care would be available relatively quickly, compared to the WFR training where we were taught help may be hours or days away. As such we practiced a lot with tourniquets. Each one of us had a CAT tourniquet and during class Ross would randomly call out a limb and we had to apply the tourniquet as fast as possible and check our pulse to ensure it worked.
I was surprised how quickly we were supposed to resort to TQs. If you can’t stop heavy bleeding with direct pressure to the wound and it’s on an arm/leg, immediately put a TQ on the limb. In WFR we were taught a TQ was a last resort after direct pressure, compression bandage, and wound packing, which makes sense because a TQ needs to be off in a few hours.
Here, if a TQ (or two) didn’t stop the bleed on a limb, or it was an area such as the hip or shoulder where a TQ couldn’t be applied, then start packing the wound with hemostatic gauze, and put a compression bandage (e.g. Israeli bandage) over it to hold pressure on the gauze, thus keeping pressure on the arteries/veins against a bone. After practicing packing a wound on a mock limb, I realized that properly packing gauze into a big wound takes quite a bit of time to do (and I’m told will be considerably painful to the patient, who might fight it), whereas stopping the flow of blood with a TQ was very fast.
I learned a several interesting things about tourniquets. While ideally they shouldn’t be on more than two hours before the next level of care, in some extreme cases they have been left on 16 hours without loss of limb. If you can see the wound, it’s okay to put a TQ on a few inches above the wound (arteries have elasticity and may retract into the body), otherwise it’s equally okay to just put the TQ as high up on the limb as possible too. This was something I was confused about as I had read conflicting ways to apply them. Once a TQ is on (more than a couple of minutes), never take it off or relieve the pressure, as you’ll be releasing blood clots and alkaline blood into the system which could cause an embolism in the heart/lungs/brain, or worse. Lastly, when using a CAT tourniquet which uses velcro, be sure the end is secure. When it goes around a leg it’s very easy to snag the tab and undo the entire tourniquet. For this it may be better to use CATs on arms and SOFTT-W (which uses a strap) around legs.
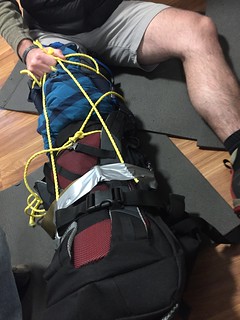
I practiced some with a SWAT-T tourniquet, which is basically just a long strip of 4″ wide rubber. I’m told the idea originally came from a Detroit SWAT officer who cut the innertube of a bicycle to improvise a TQ when he was hit. The thing needs a lot of practice to use, as it’s very hard to put on one handed, keep it really tight, and keep wide enough. It works, but I’d want something better.
The initial patient assessment was also slightly different than wilderness, instead of ABCDE, here it was HABCDE (H for hemorrhage) with an emphasis on immediately performing a much more aggressive blood sweep on the body to look for bleeding or holes. Granted, in both courses we were told the sequence isn’t set in stone, do what needs to be done in whatever order is most important, just make sure all parts of the assessment are done. Spinal control wasn’t as of an immediate concern in the D part of the assessment as wilderness, compared to stopping bleeding and opening an airway. It was explained with a brutal bit of logic, “they may be paralyzed after, but they’ll be alive”, as opposed to spending time to stabilize the spine while they asphyxiate.
Decompression needles for a tension pneumothorax seem to be a negative thing to have on you if you don’t have higher levels of training/certification. Even if an off-duty paramedic shows up, using the needle while they’re off duty opens even them up to liability. However nasopharyngeal airways are not considered intrusive and can be inserted by a Good Samaritan rescuer to keep an airway open.
Further on the train of thought that emergency care was quickly available, we were taught to splint broken bones as found even if they were compound fractures. I did learn a nifty figure-8 splint made out of triangle bandages to support a broken clavicle.
One thing that was good about the class was the “graphic” images and videos during the lecture. I guess I got over any squeamishness I had. It’s one thing to have a chest wound, flail chest, or femoral bleeding described in a textbook, it’s another thing to actually see one to really understand it. A couple of short video examples showed how quickly (less than a minute) somebody could be hit with gunfire or inhale toxic chemicals, degrade and be well into deep shock or unconsciousness without any sort of help available before dying.
Beyond first aid, the DART course also spent time on how the body reacts during a life threatening event, which I found interesting. Individuals may fight, flight/run, posture, or completely submit to a threat. As heart rate increases due to a fear/stress response, critical thinking and logic is severely impaired. Thus, a person with a better cardio conditioning can stay level headed longer because their pulse isn’t skyrocketing as fast. Not only does the body dump adrenaline during a flight/fight response, it also dumps the body’s entire supply of glucose, and ramps up production of cortisol which helps blood clotting. Also it’s common for people to lose bowel control and soil themselves in a high stress situation, something that’s not talked about much. So, if you’re going on patrol, go to the bathroom first.
In the last couple of hours of the second day we went through several quick scenarios. This was pretty familiar from the WFR training. Some of us were sent outside, the rest were inside with a mock injury (no moulage here), go in and help them. Here several of the examples involved applying tourniquets. We also practiced a Hawes carry, which was a pretty quick and easy way to pick somebody up onto your back like a backpack and carry them, while still having an arm free to work or shoot back.
Overall I really liked the class. If you’re into shooting sports, definitely take the DART class and learn how to use a medical kit/IFAK. Even if you’re not a shooter, it’ll help prepare you for other serious injuries around the home or on the road. Several of the “saves” mentioned on Dark Angel’s website are from vehicle accident injuries where somebody with the right mindset was able to use a med kit to stop bleeding on some poor soul on the road. WFR was one of the “what to do next” recommendations beyond a first aid class. If you have the time, certainly do both, they were very interesting. While there was some overlap, each class has a focus on very different things.


