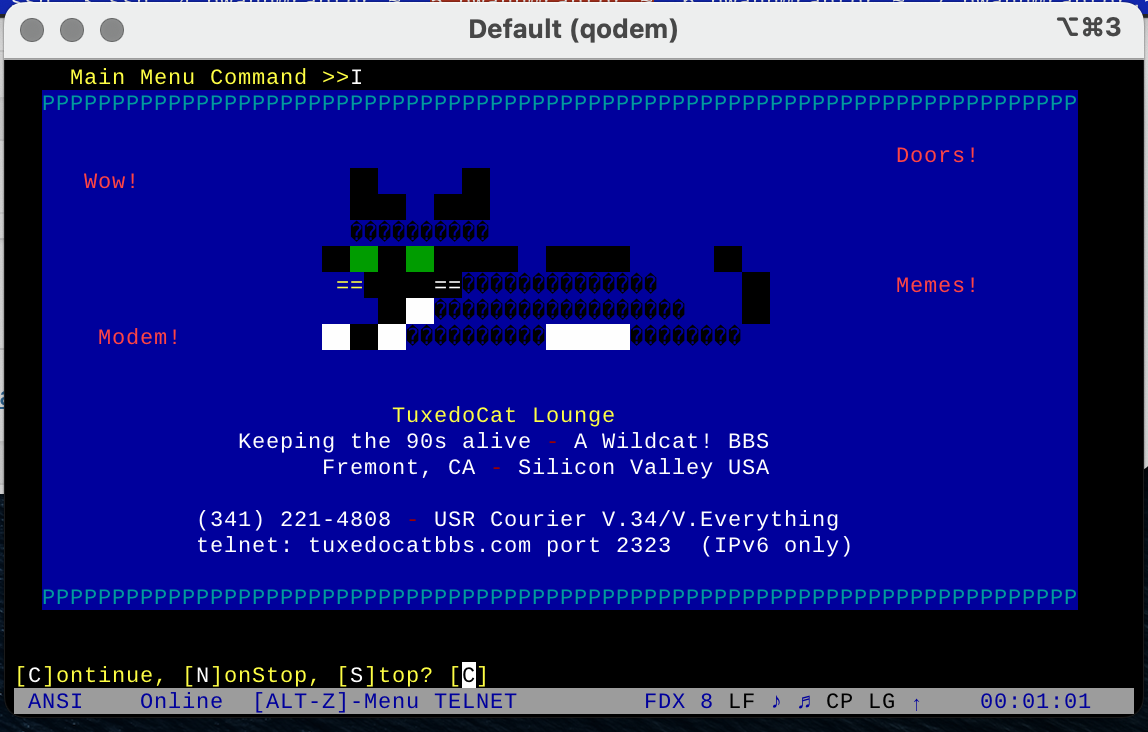
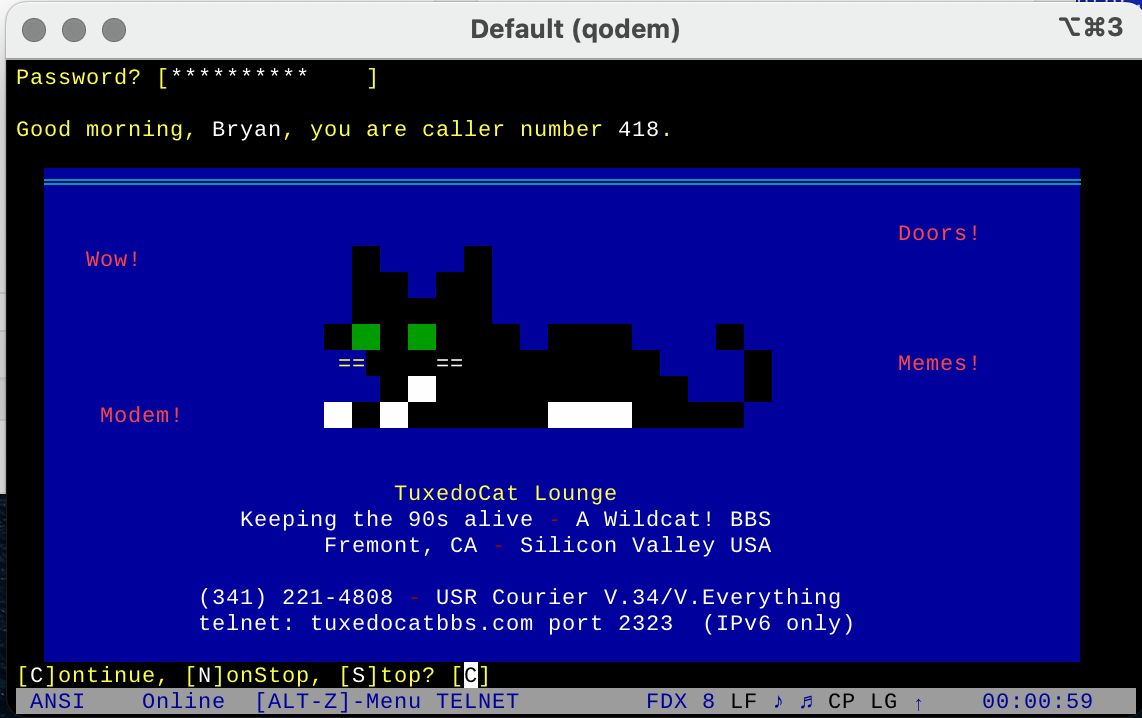
TuxedoCat Lounge BBS
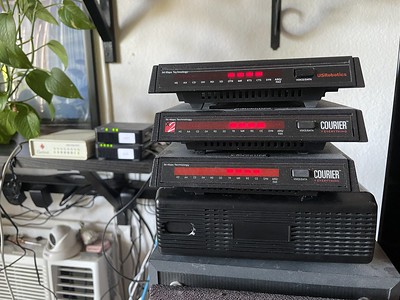
This year’s project has been running a vintage DOS-based bulletin board system like I use to run in 1995 before I started my ISP. I’m running Wildcat! 4.20 Multiline 10, the same as I did back then, except now under Windows 7 32-bit instead of Windows 95. It has real US Robotics Courier modems that you can dial into, along with supporting telnet connections. I have several drafts written up about the project, I just haven’t decided where to start. (Some info is linked at a top tab on my site)
I had my first ever Internet interactions with BBSes that offered e-mail gateways and had my first e-mail address in 1994. I wished to do the same thing back then, but it just wasn’t affordable for a teenager between the provider fees, long distance charges, and frankly I had no users.
Most BBSes did not have TCP/IP stacks until the late 90s, thus no SMTP. For message networks, dial-up modem store-and-forward was the name of the game, be it FidoNet, or calling up a UNIX system and using UUCP (UNIX to UNIX copy) to gateway mail+usenet to the Internet.
After setting up my Wildcat! board this year I pondered if it was possible to set up wcGate and actual, authentic dial-up UUCP in 2023. All the traditional UUCP mail+usenet news providers are long gone, even the TCP based ones, so I’d have to roll my own. Most documentation explaining how to set up a BBS to use a UUCP or Internet Service Provider spent far more time explaining how to secure a Internet domain name, describing how expensive an ordeal it was, or preaching netiquette, and virtually nothing about what happens under the hood as that was the provider’s job. I have no experience at all with UUCP and wanted to see if I could get it working.
wcGate
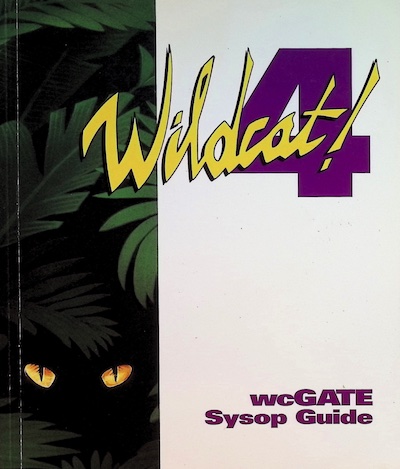
The elusive wcGate Sysop Guide
The accompanying message handling software for Wildcat! was an add-on called wcGate. This served as a message gateway from the BBS to a variety of systems such as Novell MHS (mail to Novell Netware users in your org), other BBSes, and Internet email and usenet newsgroups via UUCP and satellite connections (e.g. the now defunct Planet Connect, PageSat).
It was a whole side quest getting documentation for wcGate. It’s long since been discontinued and I hear when Mustang Software sold off Wildcat!, no manuals made it. I had my old sysop manual for Wildcat!, but not wcGate. I spent weeks searching Google, Bing, Pirate Bay, Reddit, FB groups, BBS libraries, BBS archives, eBay, university libraries, nothing. Out of pure desperation and curiosity I searched the Library of Congress and found they actually had a physical copy in their collection and I was seriously in contact with them to have it duplicated just to amuse myself (they balked until I could get copyright holder permission because they were technically selling me a copy). Eventually somebody on Facebook heard my plea and very graciously got me a copy of the manual, and I set off to figure out how to get it set up.
I threw together a Raspberry Pi, Taylor UUCP, an extra modem as my UUCP host and got wcGate talking to it in a couple of afternoons. Despite getting a 40 year old protocol working with a 30 year old DOS application, it was actually pretty straightforward.
I won’t go into the implementation details here, I’ll save that for another post. However I will go through the life of a message. I will soon upload Chef cookbooks to Github that I created for setting up DKIM, mgetty, and UUCP.
Topology
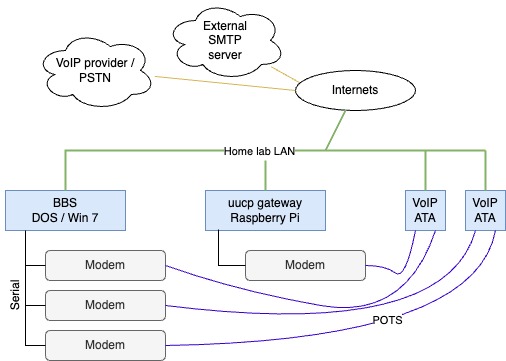
- Modems are connected to Cisco analog telephone adapters (ATA191, SPA112), and subscribed to a VoIP provider to provide a real phone number for inbound calls
- Each modem has its own telephone extension which allows for internal calls for free
- “tuxedocat” is the UUCP site name of the BBS, and “wannnet” is the UUCP site name of my Raspberry Pi.
- wcGate automatically maps an e-mail address of <firstname>.<lastname>@tuxedocatbbs.com to users on the BBS.
- uucp.wann.net is the FQDN of the Raspberry Pi.
BBS message to Internet walkthrough
It’s worth emphasizing that this is a batch process, it’s not real time like SMTP. In the old days a BBS without a full time Internet connection might dial up a UUCP provider once or twice a day to send e-mail to the Internet, meaning it may take 24 hours from the time you sent it before the recipient got it. If they replied to it, it might take another 24 hours for the reply to make it back to the BBS!
Here at TuxedoCat Lounge the e-mail is processed every 2 hours.
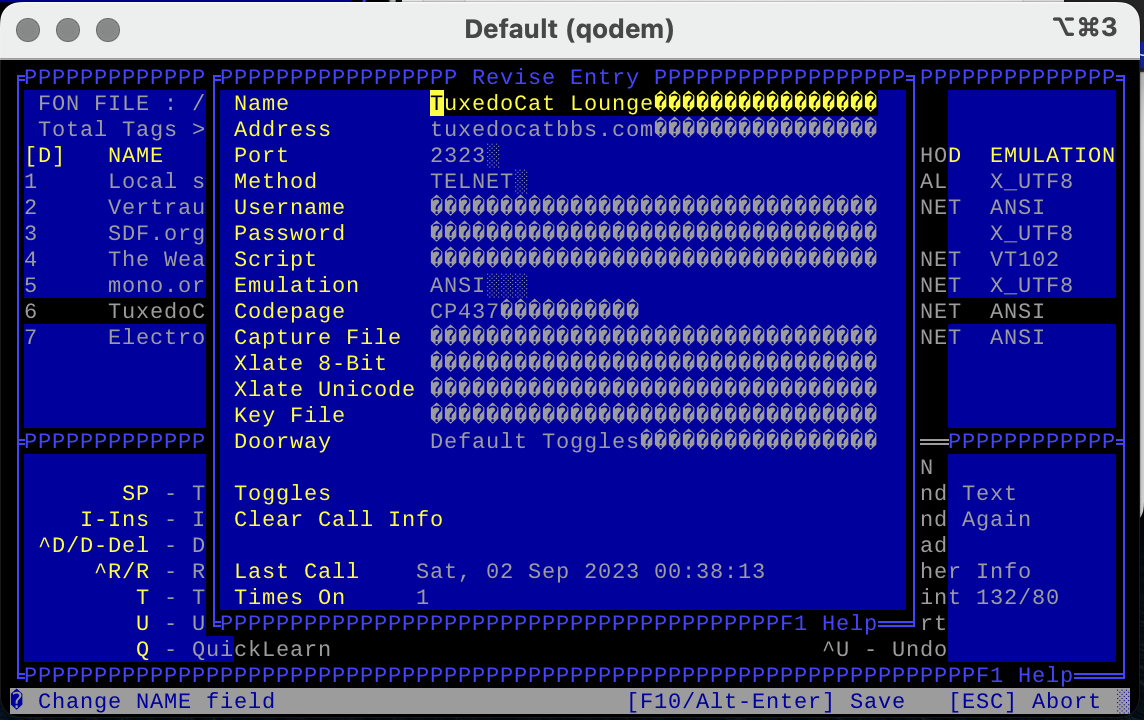
New message
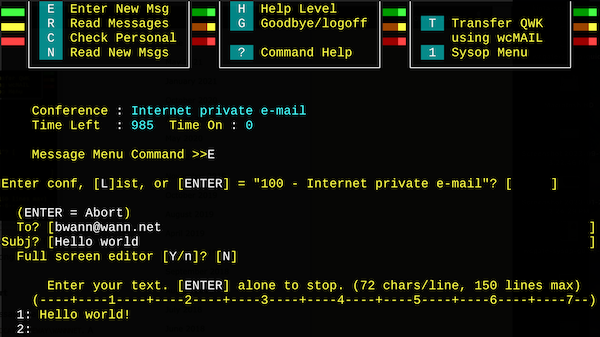
Creating a new message on the BBS
First we’ll join the Internet e-mail message conference on the TuxedoCat Lounge BBS, and create a new message. Wildcat! supports long To: fields for Internet e-mail, it used to be you had to kludge this by putting the e-mail address on the first line of the message.
Batch export of messages and prep for transport
Behind the scenes on another node or during a scheduled event, wcgate export is run. This exports messages from the Wildcat! message database to UUCP working files in a local spool directory, here in C:\WILDCAT\GATEWAY\WANNNET. A message-id and e-mail headers are generated for each message.

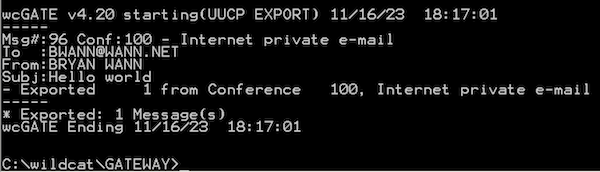
Running wcGate to export messages
Normally this is all ran from a batch script via node event every few hours to export, call the UUCP provider, and import replies.
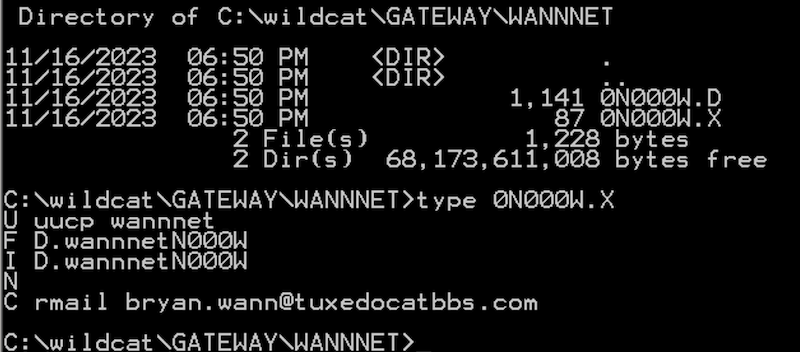
In the spool directory, for each outbound e-mail there are three files: .CMD, .DAT, and XQT.
One good reference for these files can be found in the IBM z/OS manual.
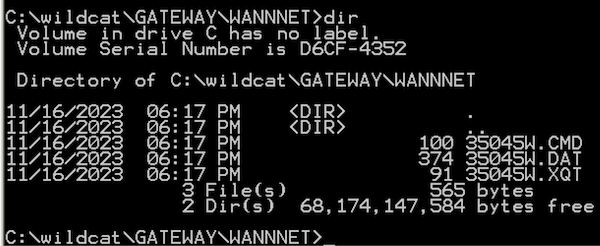
UUCP working files created on BBS for test message
.DAT – data file, contains the actual e-mail contents, and message header.
.CMD – command file, contains two lines to perform two file transfer requests.
C:\wildcat\GATEWAY\WANNNET>type 35045W.CMD
S 35045W.DAT D.tuxed35045W root - 35045W.CMD 0666
S 35045W.XQT X.tuxed35045W root - 35045W.CMD 0666
The format is
‘S’ – send a file from local to remote, followed by the local filename, and then the destination filename. The sender name, in this case ‘root’, then the local temporary file name (??), and local file permissions. Since this is a DOS machine, wcGate fabricates the root and file perms fields for us.
.XQT – execute file, contains a list of commands we want the remote site to execute for us.
C:\wildcat\GATEWAY\WANNNET>type 35045W.XQT
U bryan.wann tuxedocat          # <- remote user, remote site
R bryan.wann                    # <- ??
F D.tuxed35045W                 # <- filename to run
I D.tuxed35045W                 # <- file to use as STDIN to the app
C rmail bwann@wann.net
In this case we want the remote site (our UUCP gateway) to ultimately run rmail bwann@wann.net, that is, run the Unix rmail command with the argument bwann@wann.net and use the file D.tuxed3504SW file as STDIN which contains the message. (More on rmail later)
Note that all of these UUCP commands are baked into wcGate, we have no ability to fiddle with them.
FX UUCICO

Running uucico to contact the remote site ‘wannnet’
Once the message(s) have been exported to the spool directory, it’s time to dial-up our UUCP host. This is done by a DOS-based software included with wcGate called FX UUCICO (unix to unix copy in copy out). Configuration files in C:\WILDCAT\GATEWAY such as DIALERS, SCRIPTS, SYSTEMS, FXUUCP.CFG tell UUCICO how to interact with the outside world.
DIALERS – contains a list of modem definitions, modem speeds, and expect-style chat script to send AT commands to the modem for initializing, dialing, and how to know when the call is connected.
SCRIPTS – More expect-style scripts for logging into the remote UNIX UUCP host, e.g. look for the login: and password: prompts, send passwords, and any other extra UNIX shell commands before starting the UUCP transfer.
SYSTEMS – A list of remote systems/hosts we’re allowed to connect to. This ties together which modem to use from DIALERS, which chat script from SCRIPTS to log in, and what username/password to use for logging in.
FXUUCP.CFG – contains configuration commands such as our local site name, which type of comm/serial driver to use, buffering, and how many times to retry the call.
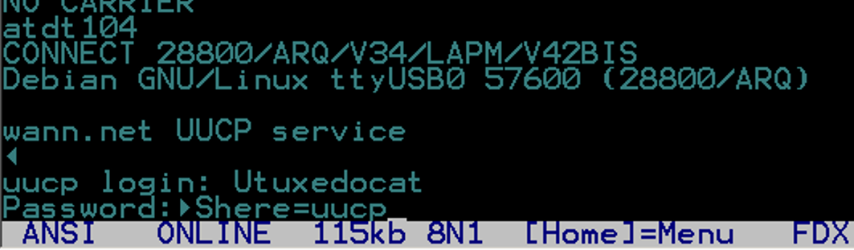
C:\WILDCAT\GATEWAY\UUCICO.EXE is ran, specifying which system to connect to. It creates a lockfile for the modem serial port, and sends AT-commands to dial the UUCP host. After dialing and logging in, the UUCP copying magic happens.
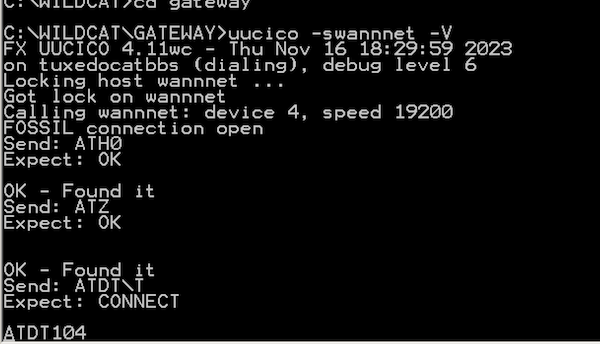
uucico dialing extension 104 on the modem
UUCP host/gateway/provider
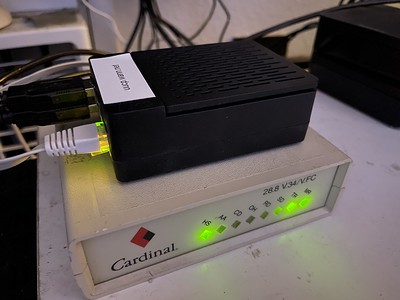
Raspberry Pi and dial-up modem acting as UUCP provider
I use a Raspberry Pi running Debian 12, Taylor UUCP, Postfix, mgetty, and an old Cardinal 28.8k modem as my UUCP <-> SMTP gateway. This sits on my homelab LAN, and to avoid problems trying to run an Internet-facing SMTP server at home, mail is relayed to/from my public SMTP server at Linode. For the modem’s telephone connection it’s connected to one of the same Cisco ATAs as the BBS modems are connected to, so the call does not have to go out to the Internet nor PSTN.
I thought this was going to be a giant ordeal and I was going to miss some glaring chunk of the big picture, but since I was just taking inbound calls it wound up being pretty easy. Postfix provides an rmail binary (and in some packages it’s just a wrapper script around sendmail) for UUCP->SMTP, and the stock master.cf config already has a entry for calling UUX for SMTP->UUCP. Thank god for applications keeping legacy configurations around!
To give e-mails an extra boost to avoid being spam filtered, I set up DKIM to sign messages as soon as they’re received from the BBS, and added SPF rules to the DNS domain. This seems to help with Gmail, but not everywhere. Troubleshooting my SMTP relay and setting up DKIM took far more time than the rest of this project.
Mgetty interfaces with the modem, providing a plain ordinary login tty when the modem answers.
The BBS has its own Linux user account on the UUCP host, called Utuxedocat. There’s not a lot special about it. It’s homedir is /var/spool/uucppublic and it’s shell is set to /usr/lib/uucp/uucico. The password for the uucp connection is also in /etc/uucp/passwd, because uucico can’t read /etc/shadow.

The username starts with the letter ‘U‘ to traditionally indicate it’s a system dialing in, and not a user. mgetty can also be configured to automatically start uucico if a login name matches U*.
When the Utuxedocat account logs in, it automatically starts up uucico instead of a shell like bash. There’s a whole little handshake process taking place between uucico on the BBS machine and the one on the Linux machine. Things like transfer protocols, packet and window size are established. FX UUCICO actually can log this in great detail which is kind of interesting if you want to get into the weeds of how it works.
Update 14-May-2024:
After learning more about UUCP thanks to the Bear book, I learned there’s a couple of ways to start up UUCICO. One way is like how I’m doing it and mgetty is answering the phone, gets the username, and then passes off authentication to either uucico or /usr/bin/login. In this case uucico is running as user ‘uucp’, it can’t access /etc/shadow, and thus you must use the Taylor /etc/uucp/passwd file to authenticate users. (Note: in this case /etc/uucp/passwd must be owned uucp:uucp, mode 640). I haven’t tested this but I’m pretty sure it means the unix password can be locked for the Uusername account as it’s never used. Another benefit of mgetty is that it also lets you start up PPP sessions to modem callers if you’re doing that sort of thing.
One is to set /usr/lib/uucp/uucico as the unix account shell so uucico and only uucico starts up right away. This would be useful for inbound TCP connections, and I think it would use the shadow password file for authentication.
Here is where mgetty has answered the phone, the username is passed to uucico, uucico authenticates the password, and then presents the “Shere” (system here) prompt.
Example of logging in and seeing the “Shere=uucp” session start message from the remote uucico program
Pending spool files are transfered, and uux is called to execute rmail (from the .XQT file) on the remote system to send mail messages to Postfix. (This also happens in reverse, pending incoming email from the Internet that are spooled up on the UUCP host are fed to a dummy ‘rmail‘ command on the BBS machine.)
UUCICO finishes and hangs up. Any email destine for the Internet is processed normally by Postfix and sent out via SMTP.
Here’s the log file from /var/log/uucp/Log with our Hello World:
uucico tuxedocatbbs - (2023-11-16 18:30:47.52 281914) Handshake successful (protocol 'g' sending packet/window 64/7 receiving 64/7)
uucico tuxedocatbbs root (2023-11-16 18:30:48.70 281914) Receiving D.tuxed35045W
uucico tuxedocatbbs root (2023-11-16 18:30:50.01 281914) Receiving X.tuxed35045W
uucico tuxedocatbbs - (2023-11-16 18:30:50.59 281914) Protocol 'g' packets: sent 6, resent 0, received 13
uucico tuxedocatbbs - (2023-11-16 18:30:51.18 281914) Call complete (6 seconds 465 bytes 77 bps)
uuxqt tuxedocatbbs bryan.wann (2023-11-16 18:30:53.20 282183) Executing X.tuxed35045W (rmail bwann[at]wann.net)
It has received the data and execute files that wcGate generated, and executes the request.
And here’s where Postfix picked up the message from rmail, signed with DKIM, and sent out via SMTP to the Internet:
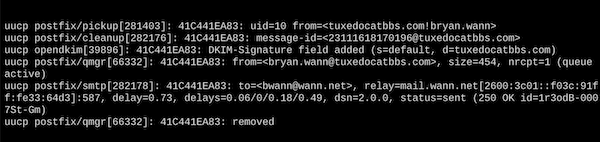
Postfix log showing message sent to the Internet
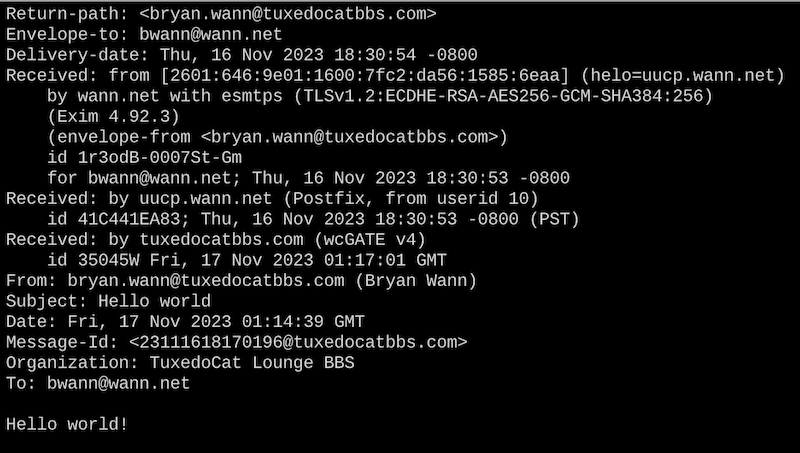
Success!
Here is the email from the BBS in my inbox (DKIM header removed for brevity):
An e-mail reply
When I reply to my message from the BBS and send it using SMTP, Postfix will receive the message and then call out to UUX to write it to the local spool directory:

Postfix handling a message from SMTP and delivering to UUCP spool
Likewise there’s an entry in /var/log/uucp/Log showing the UUCP subsystem processed it and it’s sitting in the spool directory:

After another cycle of running UUCICO on the BBS machine:

Any email/replies destine for the BBS are now sitting in C:\WILDCAT\GATEWAY\WANNNET:
Batch import of new mail
wcGate is ran again, this time with an import command. This reads emails from the local spool directory and inserts them into the Wildcat! message database.
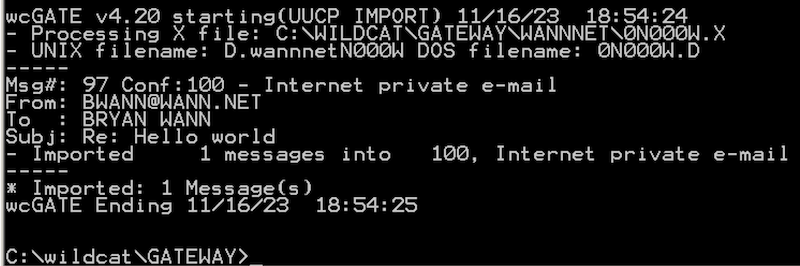
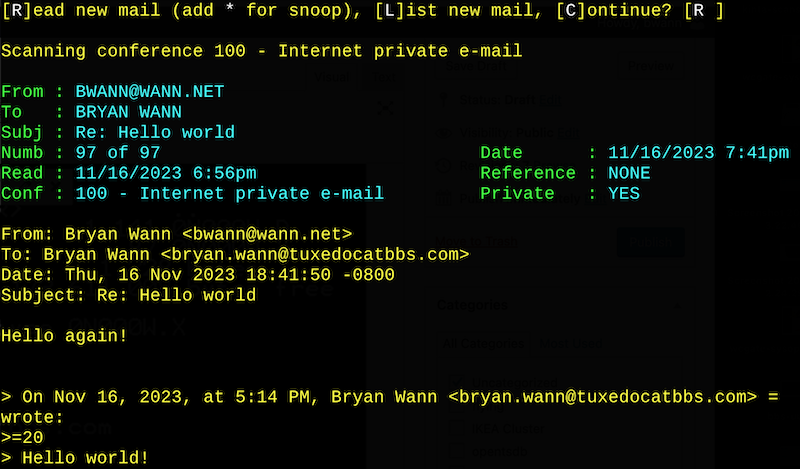
Now the email shows up ready for the caller to read!
Will I be a purveyor of fine UUCP service for retro setups? Maybe. I’d like to learn more about UUCP workings, and maybe get private usenet working before then.
Update 2024-03-26: The Internet Archive has a copy of the 1996 book Using & Managing UUCP 2nd edition which is a great in-depth guide to UUCP!
Tags: bbs, uucp


